Why do you need to use a .NET obfuscator?
There are a lot of reasons to use obfuscate your code:
- Intellectual property protection: Obfuscation makes it harder for reverse engineers and hackers to understand and modify the code, protecting a company’s intellectual property and proprietary algorithms.
- Code security: Obfuscation helps to safeguard sensitive information and prevent code tampering, reducing the risk of unauthorized access and data breaches.
- License enforcement: Obfuscation can make it more difficult for others to bypass license restrictions and use software without proper authorization.
- Anti-piracy measures: Obfuscators can make it more challenging for hackers to crack or modify software to be used without permission, which can help combat software piracy.
- Protecting trade secrets: Companies may use obfuscation techniques to protect trade secrets and reduce the likelihood of competitors reverse engineering and replicating their software.
Overall, using .NET obfuscators helps enhance software security, protect intellectual property, and safeguard sensitive information from unauthorized access or tampering.
How to obfuscate WPF applications?
In this guide, let’s create a straightforward WPF application that verifies entered passwords.
The project code for this tutorial can be found on GitHub at https://github.com/Softanics/WPFObfuscationSample
I personally prefer using the command line, but you can achieve the same outcome by using either Visual Studio or JetBrains Rider.
Start by creating a folder called WPFObfuscationSample, navigate into it, and execute the command dotnet new wpf to generate the basic structure of the application.
Next, open MainWindow.xaml and insert a textbox and a button:
<Window x:Class="WPFObfuscationSample.MainWindow"
        xmlns="http://schemas.microsoft.com/winfx/2006/xaml/presentation"
        xmlns:x="http://schemas.microsoft.com/winfx/2006/xaml"
        xmlns:d="http://schemas.microsoft.com/expression/blend/2008"
        xmlns:mc="http://schemas.openxmlformats.org/markup-compatibility/2006"
        xmlns:local="clr-namespace:WPFObfuscationSample"
        mc:Ignorable="d"
        Title="MainWindow" Height="450" Width="800">
    <StackPanel>
        <TextBox Name="textBoxPassword" />
        <Button Content="Check" Name="buttonCheck" HorizontalAlignment="Center" />
    </StackPanel>
</Window>
Next, make modifications to MainWindow.xaml.cs in order to display the hash of the entered password in a readable format:
public MainWindow()
{
    InitializeComponent();

    buttonCheck.Click += (sender, e) =>
    {
        using (var algorithm = SHA256.Create())
        {
            var hash = algorithm.ComputeHash(Encoding.UTF8.GetBytes(textBoxPassword.Text));
            var readableHash = Convert.ToBase64String(hash);

            MessageBox.Show(
                owner: this,
                caption: "Hash value",
                messageBoxText: readableHash,
                button: MessageBoxButton.OK);
        }
    };
}
Build and run the application. Enter ArmDot into the textbox and click the Check button. A message box will appear displaying the hash value. Press Ctrl+C to copy this value to the clipboard. We will need it to validate the entered passwords:
public MainWindow()
{
    InitializeComponent();

    buttonCheck.Click += (sender, e) =>
    {
        using (var algorithm = SHA256.Create())
        {
            var hash = algorithm.ComputeHash(Encoding.UTF8.GetBytes(textBoxPassword.Text));
            var readableHash = Convert.ToBase64String(hash);

            MessageBox.Show(
                owner: this,
                caption: "Result",
                messageBoxText: readableHash == "hzTbLivrxGSCjSfDqNEIDuXEbj1W6IXdPikhanYqTu0=" ? "Correct" : "Incorrect",
                button: MessageBoxButton.OK);
        }
    };
}
Build the project again and enter ArmDot as a password, then click on Check. The application will indicate that this is a valid password. Try entering a different password, and the application should display that it is incorrect.
However, a problem arises as the code in the application is easily readable from the compiled executable file. If you run ildasm WPFObfuscationSample.dll, you will see something similar to the following:
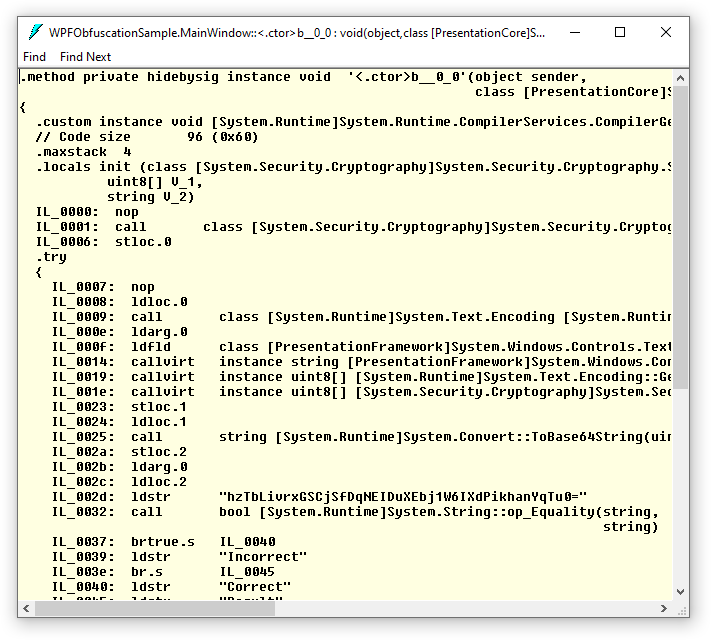
It’s incredibly easy to comprehend and modify! All the strings are fully visible, and the logical structure of conditional jumps is obvious. Of course, you wouldn’t want someone to easily understand your application’s logic like that.
.NET obfuscator to the rescue!
To add two packages, ArmDot.Client and ArmDot.Engine.MSBuildTasks, use the following commands:
dotnet add package ArmDot.Client
dotnet add package ArmDot.Engine.MSBuildTasks
ArmDot.Client includes obfuscation attributes that are utilized to guide the obfuscator on how to obfuscate your code. On the other hand, ArmDot.Engine.MSBuildTasks offers an MSBuild task that facilitates obfuscation of your application.
After installing the packages, proceed to modify WPFObfuscationSample.csproj by adding the obfuscation task to the build process, as illustrated in the example below:
<Project Sdk="Microsoft.NET.Sdk">

  <PropertyGroup>
    <OutputType>WinExe</OutputType>
    <TargetFramework>net8.0-windows</TargetFramework>
    <Nullable>enable</Nullable>
    <ImplicitUsings>enable</ImplicitUsings>
    <UseWPF>true</UseWPF>
  </PropertyGroup>

  <ItemGroup>
    <PackageReference Include="ArmDot.Client" Version="2023.11.0" />
    <PackageReference Include="ArmDot.Engine.MSBuildTasks" Version="2023.11.0" />
  </ItemGroup>

    <Target Name="Protect" AfterTargets="AfterCompile" BeforeTargets="BeforePublish">
        <ItemGroup>
            <Assemblies Include="$(ProjectDir)$(IntermediateOutputPath)$(TargetFileName)" />
        </ItemGroup>
        <ArmDot.Engine.MSBuildTasks.ObfuscateTask
        Inputs="@(Assemblies)"
        ReferencePaths="@(_ResolveAssemblyReferenceResolvedFiles->'%(RootDir)%(Directory)')"
        SkipAlreadyObfuscatedAssemblies="true"
    />
    </Target>

</Project>
Furthermore, let’s proceed to virtualize the methods of our application. Apply the VirtualizeCode attribute to the entire assembly:
[assembly:ArmDot.Client.VirtualizeCode]
You can include this line in any source file.
Next, rebuild the application. You will see:
  [ArmDot] ArmDot [Engine Version 2023.11.0.0] (c) Softanics. All Rights Reserved
  [ArmDot] Reading license key from C:\ProgramData\ArmDot\ArmDotLicense.key
  [ArmDot] THIS PROGRAM IS UNREGISTERED. Buy a license at https://www.armdot.com/order.html
  [ArmDot] Names obfuscation started
  [ArmDot] Names obfuscation finished
  [ArmDot] ------ Build started: Assembly (1 of 1): WPFObfuscationSample.dll (I:\TEMP\84\WPFObfuscationSample\obj\Debug\net8.0-windows\WPFObfuscationSample.dll) ------
  [ArmDot] Conversion started for method System.Void WPFObfuscationSample.App::InitializeComponent()
  [ArmDot] Conversion finished for method System.Void WPFObfuscationSample.App::InitializeComponent()
  [ArmDot] Conversion started for method System.Void WPFObfuscationSample.App::Main()
...
  [ArmDot] Writing protected assembly to I:\TEMP\84\WPFObfuscationSample\obj\Debug\net8.0-windows\WPFObfuscationSample.dll...
This indicates that ArmDot has successfully accomplished its task. Run ildasm once again to verify the outcome:
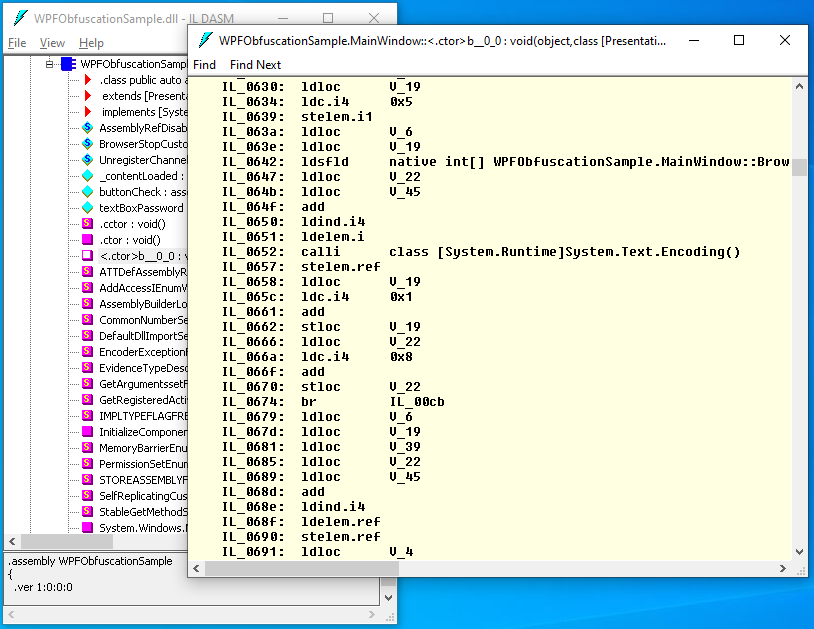
Oh my gosh! There are numerous methods with perplexing names. The code of the checking method has been transformed into an extensive sequence of instructions. It is almost impossible to comprehend the purpose of these instructions.
Conclusion
.NET obfuscators are utilized by individuals and companies for various purposes. These include safeguarding intellectual property by making it difficult for unauthorized individuals to understand and modify code, enhancing code security to prevent tampering and unauthorized access, enforcing software licenses, improving code performance, combating software piracy, and protecting valuable trade secrets.