This article describes a typical workflow for obfuscation .NET applications in the process of building them, using Azure DevOps Pipelines.
Contents
- What is Azure DevOps?
- Setup the project
- Enable obfuscation in Azure DevOps Pipelines
- How to use the licensed version in Azure DevOps?
- Conclusion
What is Azure DevOps?
Today, more and more companies are using services such as Azure DevOps to build, test, and deploy their .NET applications. That is the reason why developers want to know how to add obfuscation to the building process. Fortunately, it’s easy to do using NuGet packages for obfuscation, secret files of Azure DevOps, and by environment variables to pass additional information to MSBuild.
Let’s look at how it works with a sample .NET application.
Setup the project
The project will contain a simple console application that checks entered passwords. After validation, it outputs whether the password is correct or not.
Login to Azure DevOps, and create a new project, CheckPassword. Once it is ready, go to Repos to create a repository:
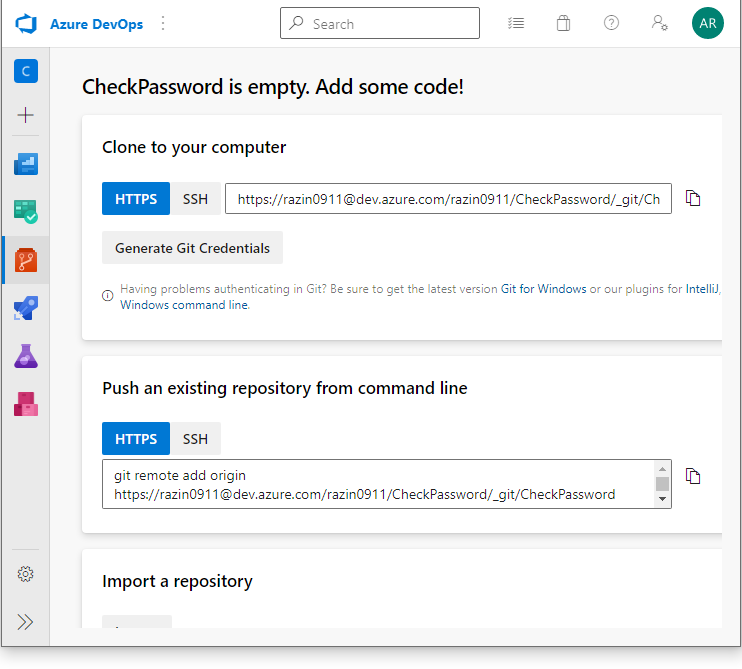
Clone the repository to your local computer using the provided URL. It’s empty now, so let’s add some code.
Enter the directory of the repository, and run the following command to create a skeleton of the application:
dotnet new console --use-program-main
It’s a good idea to create .gitignore right now (you can find it on GitHub).
Add the following code to Program.cs:
using System;
using System.Text;
using System.Security.Cryptography;

namespace CheckPassword;

class Program
{
    static void Main(string[] args)
    {
        using (var algorithm = SHA256.Create())
        {
            while (true)
            {
                Console.Write("Enter password: ");
                var password = Console.ReadLine();

                var hash = algorithm.ComputeHash(Encoding.UTF8.GetBytes(password));
                var readableHash = Convert.ToBase64String(hash);

                Console.WriteLine(string.Format($"Hash: {readableHash}"));
            }
        }
    }
}
The application will show the hash value of the entered string. Build it using dotnet build and then run. Type azure and copy the hash value somewhere:
I:\Projects\CheckPassword\bin\Debug\net7.0>CheckPassword.exe
Enter password: azure
Hash: efQ8O5wj+98pO9uoDas4uhlPwdp5GHCRs9N2Da2EC/g=
As now we know the expected hash value, modify the code as shown below:
using System;
using System.Text;
using System.Security.Cryptography;

namespace CheckPassword;

class Program
{
    static void Main(string[] args)
    {
        using (var algorithm = SHA256.Create())
        {
            while (true)
            {
                Console.Write("Enter password: ");
                var password = Console.ReadLine();

                var hash = algorithm.ComputeHash(Encoding.UTF8.GetBytes(password));
                var readableHash = Convert.ToBase64String(hash);

                if ("efQ8O5wj+98pO9uoDas4uhlPwdp5GHCRs9N2Da2EC/g=" == readableHash)
                    Console.WriteLine("Correct");
                else
                    Console.WriteLine("Incorrect");
            }
        }
    }
}
Build it and run to ensure that it works as expected:
I:\Projects\CheckPassword\bin\Debug\net7.0>CheckPassword.exe                                                                                                                                                       Enter password: github
Incorrect
Enter password: azure
Correct
It’s time to hide the details of the application. First, add two packages to enable obfuscation:
dotnet add package ArmDot.Client
dotnet add package ArmDot.Engine.MSBuildTasks
ArmDot.Client contains attributes to instruct the obfuscator which obfuscation techniques to use. ArmDot.Engine.MSBuildTasks provides a task for MSBuild that should be enabled manually. In order to do that, modify CheckPassword.csproj as shown below:
<Project Sdk="Microsoft.NET.Sdk">

  <PropertyGroup>
    <OutputType>Exe</OutputType>
    <TargetFramework>net7.0</TargetFramework>
    <ImplicitUsings>enable</ImplicitUsings>
    <Nullable>enable</Nullable>
  </PropertyGroup>

  <ItemGroup>
    <PackageReference Include="ArmDot.Client" Version="2023.7.0" />
    <PackageReference Include="ArmDot.Engine.MSBuildTasks" Version="2023.7.0" />
  </ItemGroup>

<Target Name="Protect" AfterTargets="AfterCompile" BeforeTargets="BeforePublish">
  <ItemGroup>
     <Assemblies Include="$(ProjectDir)$(IntermediateOutputPath)$(TargetFileName)" />
  </ItemGroup>
  <ArmDot.Engine.MSBuildTasks.ObfuscateTask
    Inputs="@(Assemblies)"
    ReferencePaths="@(_ResolveAssemblyReferenceResolvedFiles->'%(RootDir)%(Directory)')"
    SkipAlreadyObfuscatedAssemblies="true"
  />
</Target>

</Project>
We’ve just added the new target Protect that contains the obfuscation task. It is executed right after the compiler has done its job, but before publishing the application. So the obfuscator can take the assembly located in the intermediate directory (the compiler places it there) and obfuscate it.
Rebuild the project to check that everything works well.
You will see the following warning because we have forgotten to use obfuscation attributes:
[ArmDot] warning ARMDOT0003: No methods to protect in the assembly
Return to Program.cs and add the attribute:
using System;
using System.Text;
using System.Security.Cryptography;

namespace CheckPassword;

class Program
{
    [ArmDot.Client.VirtualizeCode]
    static void Main(string[] args)
    {
        using (var algorithm = SHA256.Create())
        {
            while (true)
            {
                Console.Write("Enter password: ");
                var password = Console.ReadLine();

                var hash = algorithm.ComputeHash(Encoding.UTF8.GetBytes(password));
                var readableHash = Convert.ToBase64String(hash);

                if ("efQ8O5wj+98pO9uoDas4uhlPwdp5GHCRs9N2Da2EC/g=" == readableHash)
                    Console.WriteLine("Correct");
                else
                    Console.WriteLine("Incorrect");
            }
        }
    }
}
Build the project once again and run the application.
It works well:
I:\Projects\CheckPassword\bin\Debug\net7.0>CheckPassword.exe                                                                                                                                                       Enter password: hahaha
Incorrect
Enter password: azure
Correct
Commit and push the changes to Azure. Go to Repos – Commits:
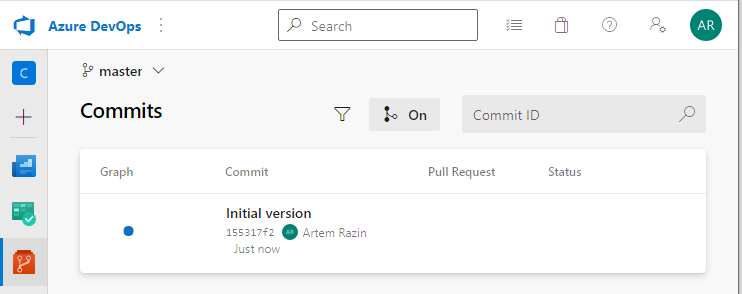
Great, the first commit is here!
Enable obfuscation in Azure DevOps Pipelines
Our task now is to build the application, obfuscate it, and publish the binaries. We need a pipeline to automate the task. Go to Pipelines – Pipelines, create a new pipeline using the suggested template .NET Desktop. Don’t make any changes; just save it:
Pull changes to your computer. You can see the new file, azure-pipelines.yml. It describes tasks that the pipeline launches:
# .NET Desktop
# Build and run tests for .NET Desktop or Windows classic desktop solutions.
# Add steps that publish symbols, save build artifacts, and more:
# https://docs.microsoft.com/azure/devops/pipelines/apps/windows/dot-net

trigger:
- master

pool:
  vmImage: 'windows-latest'

variables:
  solution: '**/*.sln'
  buildPlatform: 'Any CPU'
  buildConfiguration: 'Release'

steps:
- task: NuGetToolInstaller@1

- task: NuGetCommand@2
  inputs:
    restoreSolution: '$(solution)'

- task: VSBuild@1
  inputs:
    solution: '$(solution)'
    platform: '$(buildPlatform)'
    configuration: '$(buildConfiguration)'

- task: VSTest@2
  inputs:
    platform: '$(buildPlatform)'
    configuration: '$(buildConfiguration)'
Let’s return to Azure DevOps and run the pipeline to ensure that it works without problems. Unfortunately, it doesn’t:
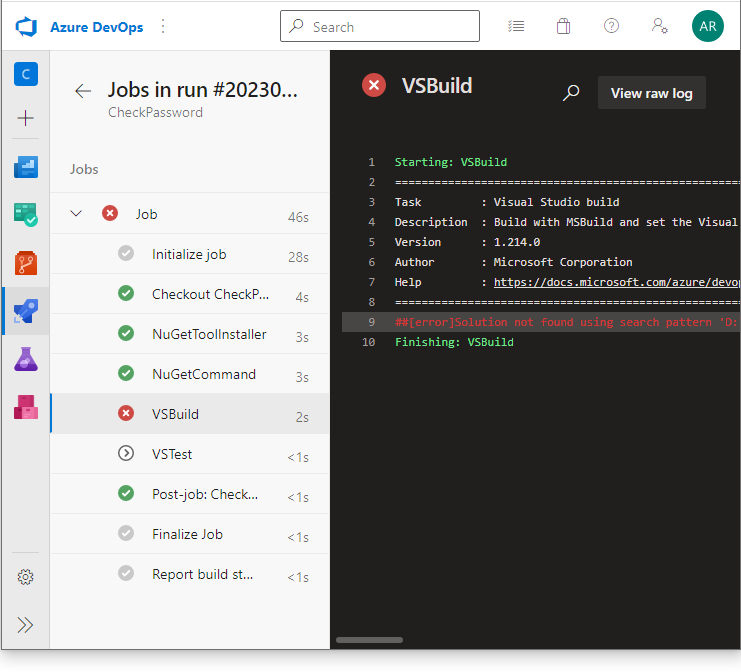
The error is obvious: we don’t have a solution file. Fortunately, it’s easy to fix with two commands:
dotnet new sln
dotnet sln add CheckPassword.csproj
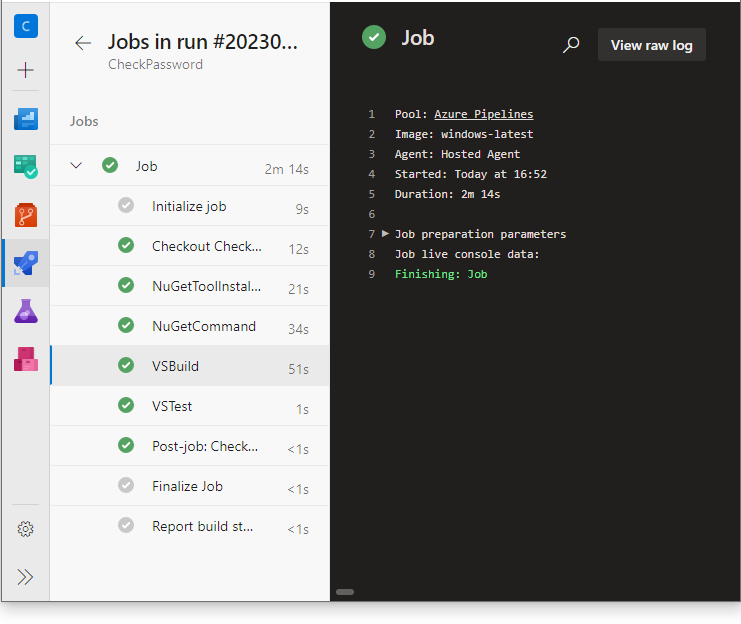
Commit and push the changes and return to Azure DevOps; this time it works without issues:
How to use the licensed version in Azure DevOps?
If you use a licensed version of ArmDot, you need to specify the path of the license file. Of course, you don’t place a license file to a repository. Fortunately, Azure DevOps provides a way to store files, called secure files. The idea is to add your license file, then consume it in a pipeline, and provide the path of the license file to ArmDot using some environment variable.
Click Pipelines – Library, Secure Files, and add the file that contains your serial code:
Open azure-pipelines.yml and add the task that downloads the license file; also add an environment variable that contains the path of the downloaded file:
- task: DownloadSecureFile@1
  name: armDotLicenseKey
  displayName: 'Download ArmDot license key'
  inputs:
   secureFile: 'armdot-license-key.txt'

- task: VSBuild@1
  inputs:
    solution: '$(solution)'
    platform: '$(buildPlatform)'
    configuration: '$(buildConfiguration)'
  env:
    ARMDOT_LICENSE_FILE_PATH: $(armDotLicenseKey.secureFilePath)
Now, ARMDOT_LICENSE_FILE_PATH contains the path of the license file. You can use the same way for other tasks like DotNetCoreCLI@2.
Let’s use the environment variable in the project file:
<Target Name="Protect" AfterTargets="AfterCompile" BeforeTargets="BeforePublish">
  <ItemGroup>
     <Assemblies Include="$(ProjectDir)$(IntermediateOutputPath)$(TargetFileName)" />
  </ItemGroup>
  <ArmDot.Engine.MSBuildTasks.ObfuscateTask
    Inputs="@(Assemblies)"
    ReferencePaths="@(_ResolveAssemblyReferenceResolvedFiles->'%(RootDir)%(Directory)')"
    SkipAlreadyObfuscatedAssemblies="true"
    LicenseFile="$(ARMDOT_LICENSE_FILE_PATH)"
  />
</Target>
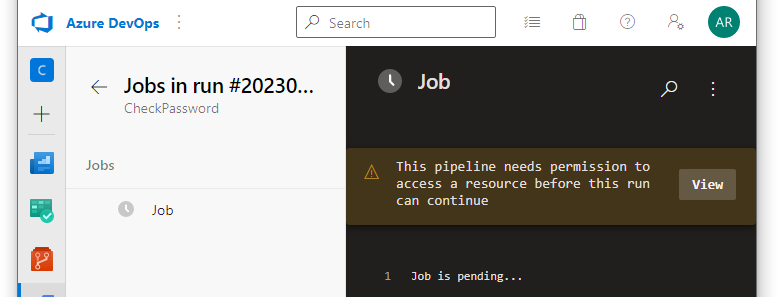
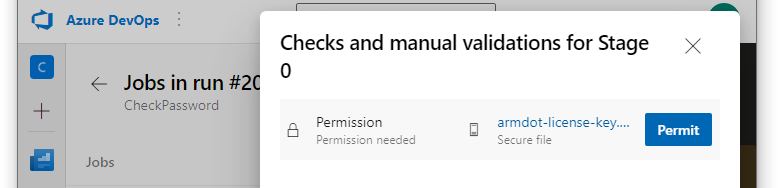
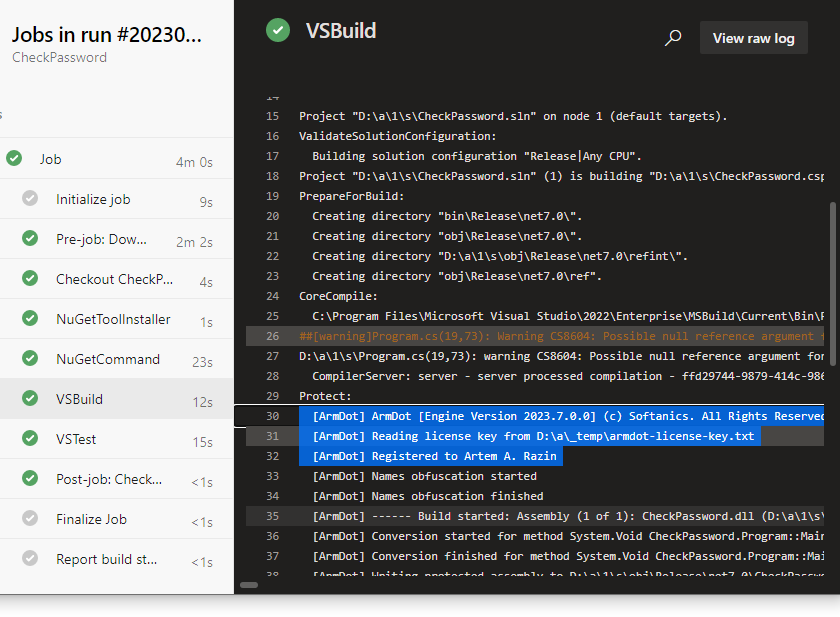
Commit and push changes, and check how the pipeline works this time. You will see that the pipeline needs permission to use the secret file with the license. Click View and then Permit to solve it:
Run the pipeline manually. This time you will see that the license file was utilized successfully:
Conclusion
Using Azure DevOps simplifies the process of building .NET applications. It’s easy to add obfuscation to the building process with the help of ArmDot. Secret files in Azure DevOps allow developers to upload the license file and use it for each build.