C# obfuscation in Visual Studio Code
Contents
Visual Studio Code (not Visual Studio!) is an open-source IDE from Microsoft that supports many programming languages. It can work as a standalone application on Windows, Linux, macOS, and even the Web. With extensions, Visual Studio Code turns into a powerful application used to develop and debug programs. Of course, Visual Studio Code fully supports .NET and C#.
ArmDot is a modern cross-platform .NET obfuscator that runs on Windows, Linux, and macOS. It provides names obfuscation, control flow obfuscation, and code virtualization. ArmDot supports .NET Framework as well as .NET Core.
This guide will teach you to enable .NET obfuscation without leaving Visual Studio Code.
Prerequisites
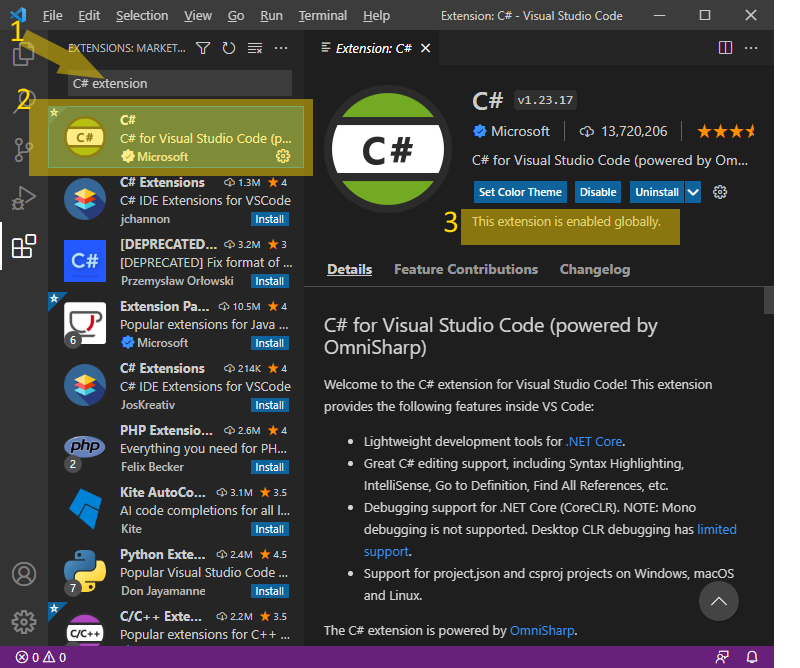
Ensure that Visual Studio Code is installed. Also, you need C# extension.
Finally, install .NET 6 SDK:
Create a sample application
Let’s create a C# console application project named “ObfuscationTest”. Start Visual Studio Code. Click to File – Open Folder from the main menu.
In the Open Folder dialog, create a new directory, “ObfuscationTest”, select it and click Select Folder. If Visual Studio Code asks Do you trust the authors of the files in this folder?, select Yes:
The folder name ObfuscationTest defines the project name and the default namespace name. Currently, the folder is empty as we will add the code later, but now we are going to create a skeleton of the application.
Click to View – Terminal to open the Terminal window. Type the following command:
dotnet new console --framework net6.0
The standard initial code is added:
Replace the generated code in Program.cs with the following one:
namespace ObfuscationTest
{
    class Program
    {
        static void Main(string[] args)
        {
            Console.WriteLine("Hello World!");
        }
    }
}
Run the debugging; ensure it displays Hello World! as expected:
Enable obfuscation
To use ArmDot, you need to add two packages: ArmDot.Client and ArmDot.Engine.MSBuildTasks. ArmDot.Client provides obfuscation attributes. ArmDot.Engine.MSBuildTasks contains an obfuscation task.
Use the following commands: dotnet add package ArmDot.Client and dotnet add package ArmDot.Engine.MSBuildTasks:

To add obfuscation to the building process you need to add a new target that is executed after compilation. Open ObfuscationTest.csproj and insert the following code right before </Project>:
<Target Name="Protect" AfterTargets="Build">
  <ItemGroup>
     <Assemblies Include="$(TargetDir)$(TargetFileName)" />
  </ItemGroup>
  <ArmDot.Engine.MSBuildTasks.ObfuscateTask
    Inputs="@(Assemblies)"
    ReferencePaths="@(_ResolveAssemblyReferenceResolvedFiles->'%(RootDir)%(Directory)')"
  />
</Target>
Now the project contains the target Protect:

Click to Run – Start Debugging; the project is rebuilt and started. Switch to Terminal, and you will see the following warning:
C:\Users\Artem\Documents\ObfuscationTest\ObfuscationTest.csproj(103: No methods to protect in the assembly C:\Users\Artem\DocumentationTest.dll
Indeed, we have not told ArmDot what exactly we want to obfuscate. ArmDot provides different options, including names obfuscation, control flow obfuscation, and others. A developer can control ArmDot obfuscation options using ArmDot attributes.
Let’s enable names obfuscation for the entire application by adding ArmDot.Client.ObfuscateNamesAttribute to the assembly:
using System.Reflection;

[assembly:ArmDot.Client.ObfuscateNamesAttribute]

namespace ObfuscationTest
{
    class Program
    {
        static void Main(string[] args)
        {
            Console.WriteLine("Hello World!");
        }
    }
}
Start debugging. Switch to Terminal, you will see:
  [ArmDot] Names obfuscation started
  [ArmDot] Names obfuscation finished
Great! ArmDot did its job.
We can obfuscate a particular method. To do that, add an obfuscation attribute to a method:
using System.Reflection;

[assembly:ArmDot.Client.ObfuscateNamesAttribute]

namespace ObfuscationTest
{
    class Program
    {
        [ArmDot.Client.VirtualizeCode]
        static void Main(string[] args)
        {
            Console.WriteLine("Hello World!");
        }
    }
}
Start debugging again and switch to Terminal:
  [ArmDot] Conversion started for method System.Void ObfuscationTest.Program::Main(System.String[])
  [ArmDot] Conversion finished for method System.Void ObfuscationTest.Program::Main(System.String[])
Conclusion
It’s very easy to add a .NET obfuscator in Visual Studio Code:
- Add ArmDot packages to a project.
- Then enable the obfuscation task in a project file.
- Finally, specify obfuscation options using ArmDot obfuscation attributes for an entire assembly or particular types or methods.